How to Create a Free RSVP and Invitation Page in Seconds
Planning a birthday party, wedding, corporate dinner, or a casual gathering can be exhausting. Getting your guest list in order and chasing down RSVPs shouldn't be.
With our online invitation tool, you can design a beautiful, responsive invitation and RSVP page in less than a minute. In this step-by-step guide, we’ll show you exactly how to set up, customize, secure, and share your event page, and how to manage your guest list like a pro.
Step 1: Create a New Event
Getting started is quick and easy.
- Log into your dashboard.
- Click on the Create Event button (or navigate to the new event page).
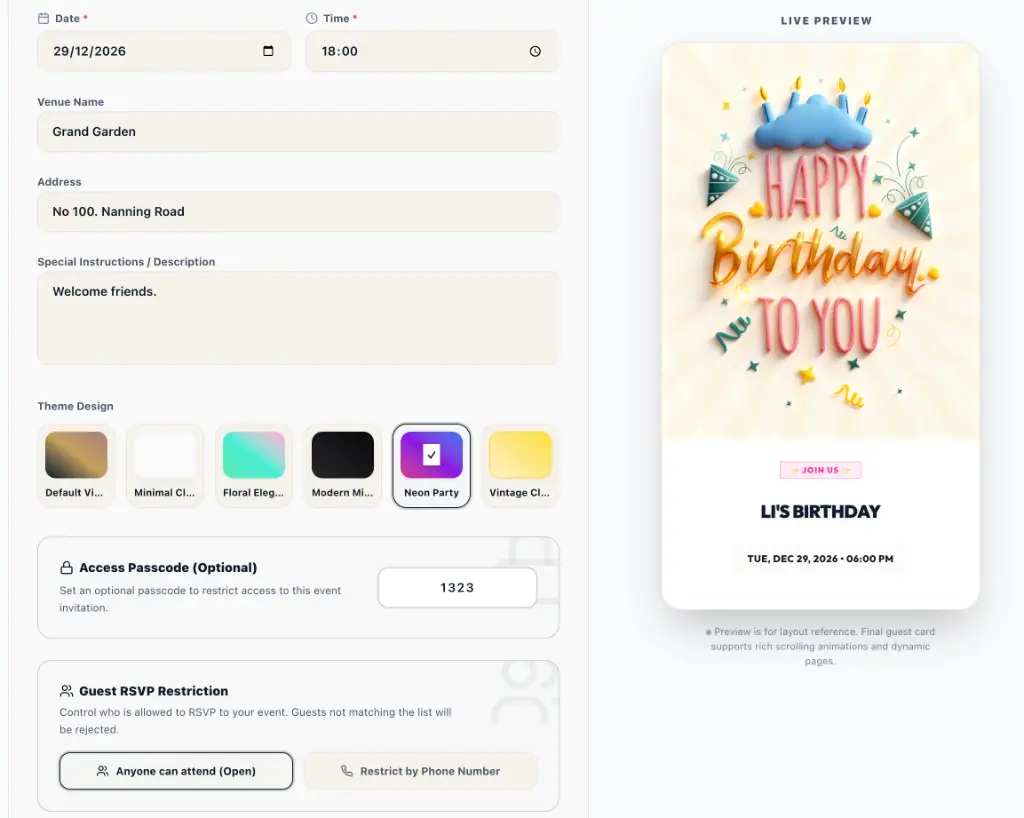
- You will be greeted by a modern, high-fidelity creation form with a Live Preview on the right. Any detail you edit will update instantly in the preview!
Step 2: Add Your Event Details & Cover Image
Next, input the core details of your gathering:
- Event Title: Give your event a catchy or formal name (e.g., “Olivia’s Sweet 16 Birthday Party” or “Annual Summer Gala”).
- Upload Cover: Drag and drop or select a header image. The platform supports PNG, JPEG, and WEBP formats (up to 3MB). A beautiful cover photo makes your invitation look premium right away.
- Date & Time: Set when your event begins using the simple date and time selectors.
- Venue & Address: Specify the name of your venue (e.g., “The Glasshouse”) and the physical address so guests can find their way.
- Description: Add special instructions, dress codes, agenda items, or warm welcomes for your attendees.
Step 3: Match Your Vibe with Premium Themes
Your event's invitation should look the part. Select from a curated collection of design themes that you can apply with a single click:
- Default: A vibrant, modern gradient styling.
- Floral: Elegant pastel mint, cream, and pink hues—perfect for weddings and baby showers.
- Modern: A sleek, high-contrast dark theme (zinc and black gradient) for upscale gatherings.
- Neon: A glowing purple, pink, and indigo styling for concerts, club nights, and parties.
- Vintage: A warm amber and cream setup with classic serif typography.
- Clean: A minimalist, distraction-free aesthetic.
Step 4: Configure Privacy & Guest Restrictions (Optional)
If you want to keep your event private, use these built-in access control tools:
- 4-Digit Passcode: Secure your invitation with a custom passcode (e.g.,
1234). Guests must enter this code before they can view the event page and RSVP. - Guest Access Control:
- Open: Anyone with the link can view and RSVP.
- Phone Restricted: Only guests whose phone numbers are pre-registered on your guest list are allowed to RSVP. This is highly effective for preventing uninvited guests or spam.
Once you’re satisfied, click Save to publish your event.
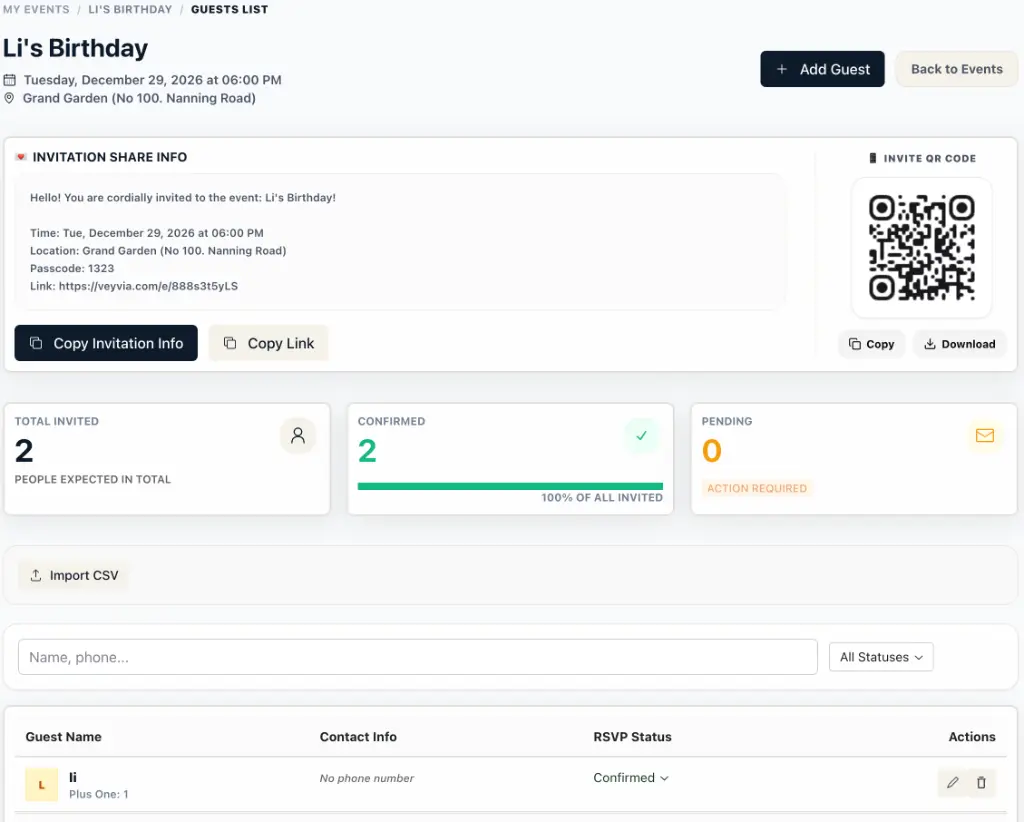
Step 5: Share Your Event Page Instantly
Sharing your invitation is seamless:
- Open your event page to view the Invitation Share Card.
- Copy the Direct Invitation Link to paste into WhatsApp, WeChat, iMessage, or email.
- Use the Copy Invite Info button to copy a pre-formatted, clean text invitation that details the title, date, venue, passcode (if applicable), and invitation link in one message.
- Download the automatically generated QR Code to print on physical cards, display at venue entries, or send to guests for quick mobile scanning.
Step 6: The Guest RSVP Experience (How Guests Reply)
When a guest opens your invitation link, they will enjoy a premium, mobile-optimized experience:
- Passcode Check: If you enabled passcode protection, they will enter the 4-digit code.
- One-Tap RSVP Status: Guests select either Attending (emerald) or Declined (rose).
- Quick Guest Count: Attending guests can choose their party size with quick-selection buttons (1, 2, 3, or 5 guests) or enter a custom number.
- Phone and Notes: Guests provide their phone number and can optionally add personal notes (e.g., dietary restrictions or messages for the host).
- Instant Confirmation: Upon submission, they see a success card. They can also modify their RSVP later if their plans change.
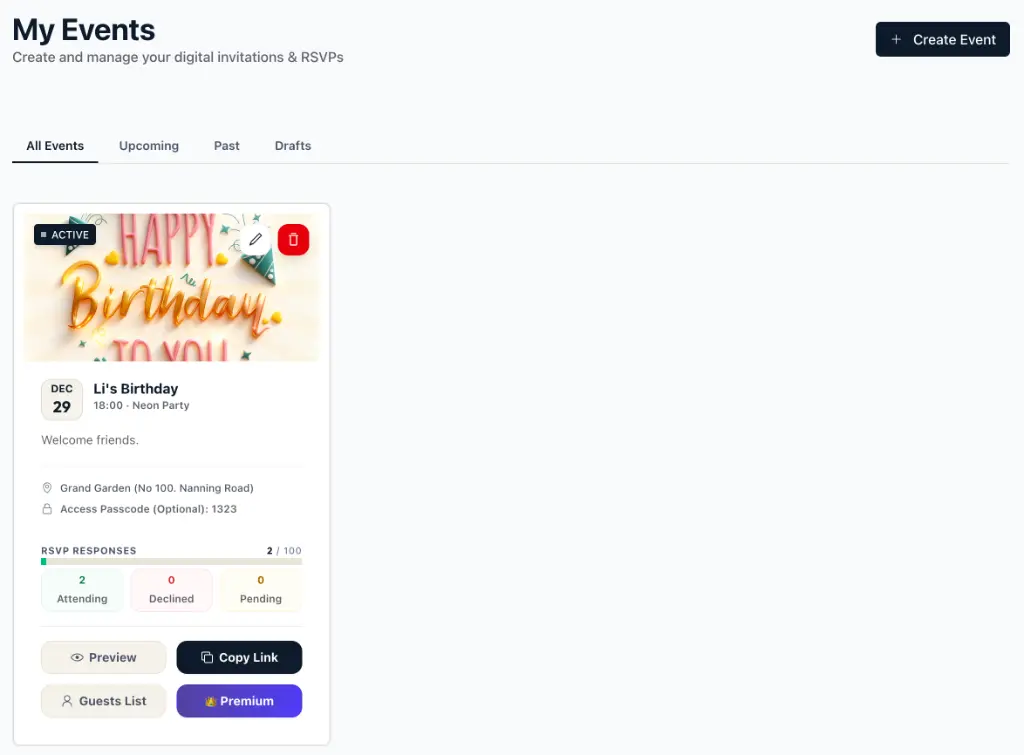
Step 7: Manage RSVPs in Real-Time
As a host, you can easily track replies in your Creator Dashboard:
- Real-time Analytics: View attendance statistics at a glance: Total Invited, Confirmed Guests, and Pending responses.
- Batch Import via CSV: If you have an existing guest list, upload it as a CSV file to import names and phone numbers in bulk.
- Filter and Search: Quickly search for guests by name or phone, and filter by status (All, Confirmed, Pending, Declined).
- Manual Overrides: Add guests manually, delete submissions, or change RSVP statuses on behalf of your guests from the guest list table.
Start Creating Your Invitation Today!
Planning events shouldn’t be stressful. In just a few taps, you can set up a premium, ad-free, and private RSVP experience for free. Create your first event today and let the platform do the hard work for you!