How to Unblur an Image
Learn how to unblur an image online, choose restoration settings, compare portrait and motion blur examples, and check whether the result still looks natural.
To unblur an image online, upload the best available original, choose a restoration mode, generate a result, and compare it with the source before downloading. Start gently: a photo that looks sharper can still contain changed faces or invented texture.
You can follow the steps below with Veyvia's photo unblur tool. It accepts PNG, JPG, and WebP images and offers Natural, Strong, and Faces modes. Processing requires signing in and sufficient account access and credits; check the credit amount shown on the button before starting.
This guide covers the workflow, two illustrated examples, and the checks that help you decide whether to keep a result. The goal might be a clearer profile picture, a rescued running photo, or a family image that is easier to enjoy on a screen. Decide what you need the image for before choosing how much reconstruction to accept.
About the examples: The portrait and running-photo comparisons in this guide use AI restoration illustrations generated with Codex imagegen. They were not processed through Veyvia and do not demonstrate measured Veyvia performance. Use them to understand what to inspect; actual results depend on your source photo and settings.
Before You Start: What Kind of Blur Do You Have?
Look at both the subject and the background. If the entire picture has directional smearing, camera movement may be involved. If the runner is blurred but the surroundings are relatively defined, subject movement may be the main problem. If another part of the scene is sharp while the face is soft, the camera may have focused at the wrong distance.
You do not need a perfect diagnosis to try a restoration. This check gives you a useful starting point and prevents you from sharpening parts of the image that were intentionally soft.
| What you see | Possible issue | What to try first |
|---|---|---|
| Soft eyes and facial edges | Missed focus or a low-quality portrait | Natural mode, then compare a Faces version if needed |
| Streaks around moving limbs or objects | Subject movement or camera shake | Natural mode first; assess a separate Strong version if needed |
| Blocky areas and smeared fine texture | Compression or low resolution | Find the original file before processing |
| A sharp subject with a soft background | Intentional shallow depth of field | Leave the background soft |
These are visual clues, not a diagnosis of how a particular file was made. Several problems can occur together. A compressed copy of a moving subject may have both blur and block artifacts, so stronger sharpening alone may not address what you are seeing.
Find the Best Source File
Use the camera original or an exported full-size copy when available. Avoid taking a screenshot of a small social-media preview. If someone sent you the photo through a messaging app, ask whether they can send the original as a file.
Keep an untouched copy before you begin. Repeatedly saving and processing an already altered version makes it harder to tell which details came from the photograph and which appeared during editing. A bigger file is not automatically a better source, but a less compressed original gives you more useful information to work with.
How to Unblur an Image with Veyvia
1. Open the Tool and Upload Your Photo
Open Unblur Photo and select Upload photo, or drag one image into the upload area. Choose a PNG, JPG, or WebP file. Confirm that the preview shows the intended photograph before continuing.
If you are signed out, sign in before generating. If signing in returns you to an empty upload area, select the file again. Uploading and generating are separate steps: selecting a photo does not mean a finished restoration has been created.
For an initial attempt, use one image whose important details you recognize. A familiar portrait makes it easier to spot changes in expression than an unfamiliar stock photo. A scene with simple clothing and a visible outline makes edge changes easier to judge.
2. Choose a Restoration Mode
Start with Natural. Its instructions favor a balanced cleanup while preserving the overall feel of the photograph. This is a practical baseline for comparing later attempts, not a guarantee that every detail will remain unchanged.
Use Faces when facial clarity is the main purpose of the edit. For example, you might care more about recognizable eyes and expression in a small portrait than about sharpness in the background. Review the face closely afterward, even if the first impression is convincing.
Try Strong as a separate attempt when the initial result remains too soft. More aggressive reconstruction can also produce details you do not want. Always compare that version with both the original and the gentler attempt before deciding which to keep.
The Careful face enhancement control adds an extra request to improve facial clarity. If you are processing a scene without an important face, you can turn it off. If a portrait changes in a way you dislike, compare another attempt with it disabled. These controls guide the restoration; they do not lock individual pixels or verify identity.
3. Check the Shape, Resolution, and Notes
Choose an Aspect ratio that matches your source as closely as possible. For the square portrait below, that is 1:1. For the landscape running photo, 3:2 is the closest match. Check the output framing afterward, especially near hands, feet, and the edge of the subject.
Choose the output Resolution you need and review the displayed credit cost. A larger output has more pixels, but that alone does not establish that more original detail has been recovered. For a first attempt, the important question is whether the subject looks right.
Use Restoration notes for specific instructions. For the portrait, you could write:
Keep the warm backlighting, original expression, face shape, and soft background. Improve apparent clarity around the eyes and hair without smoothing away natural skin texture.
For the running photo, you could write:
Keep the runner's pose, teal jacket, clothing details, and riverside setting. Reduce visible softness around the subject while leaving the distant background naturally soft.
Avoid instructions such as “make every detail perfect.” They give you no clear way to judge the result. Describe what to preserve and the area that matters most instead.
4. Generate and Inspect the Result
Select Unblur photo after checking the credit amount. Wait for the result to appear before starting another attempt. If processing returns an error, read the message and check your account access, credits, and source file before retrying.
Review the image in two ways. First, look at it at the size you intend to use: a profile picture does not need to withstand the same scrutiny as a large print. Then inspect a full-size view for changes that may be hidden in the smaller preview. If needed, download the result and open it beside the original in your image viewer.
Compare expression, proportions, edges, and repeated patterns. Look for halos, unusual eyelashes, doubled outlines, invented fabric, or skin that has lost all texture. A result can have stronger contrast and still be a worse representation of the subject.
5. Download a Separate Copy
Use Download image to save the result. Keep it separate from the original with a clear filename, such as portrait-restored, so you can compare or start again later.
If a small area needs further work, Edit image opens the editing workflow. Be specific about the change you want, and review the displayed cost before another generation. For a substantial change in restoration strength, returning to the original is often a clearer comparison than repeatedly editing reconstructed details.
Example 1: A Soft-Focus Portrait
This square portrait shows a woman looking over her shoulder in warm sunlight. The subject is soft, while the background has a diffuse appearance that belongs to the photograph's overall look. The useful question is whether facial clarity improves without changing the person or making the background unnaturally crisp.
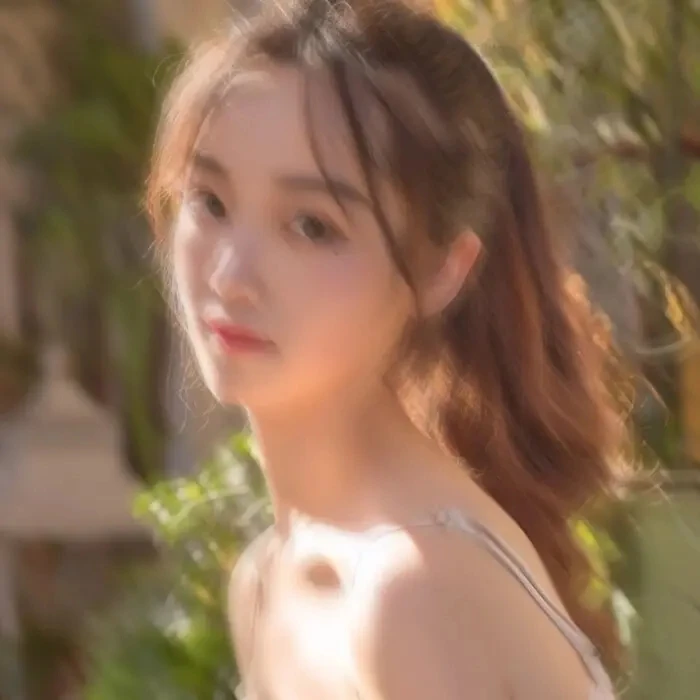
Original portrait used for the illustration.
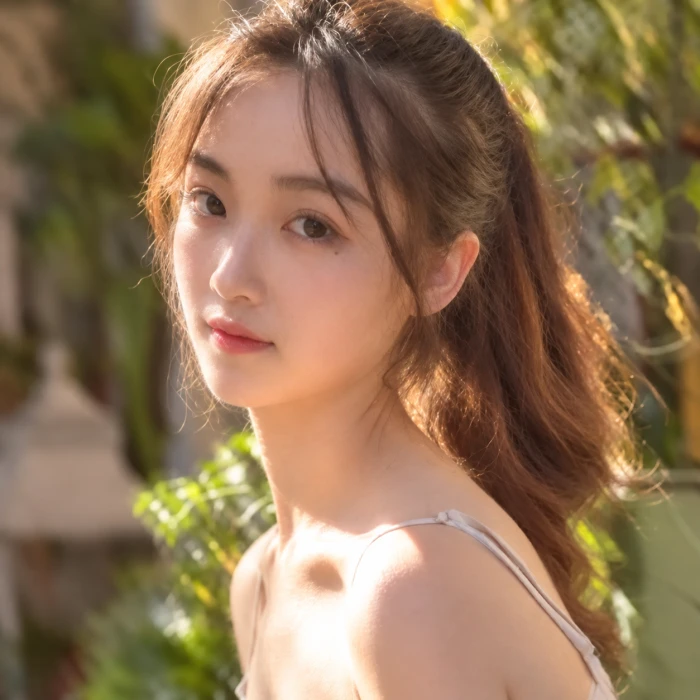
AI restoration illustration generated with Codex imagegen; not a Veyvia processing result.
Use the pair to practice checking three areas. Around the eyes, compare the gaze, eyelid shape, and spacing. Along the face, compare the cheek and jaw outline. In the hair, look for plausible strands without treating newly visible texture as proof of what was in the original.
For your own portrait, begin with Natural and the matching aspect ratio. If the face still needs attention, compare a Faces attempt from the same original. Choose the version that preserves the expression you recognize, even if another version looks slightly sharper. Background softness does not need fixing simply because the tool can make it more detailed.
Example 2: Motion Blur in a Running Photo
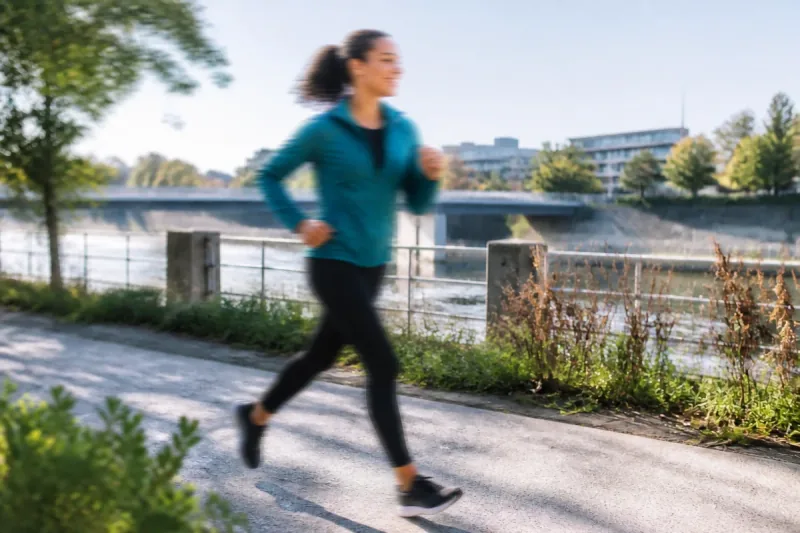
The second source shows a woman in a teal jacket running beside a river. A moving subject gives you several places to inspect beyond the face: arms, legs, clothing edges, and the relationship between the subject and the stationary background.
Original running photo used for the illustration.
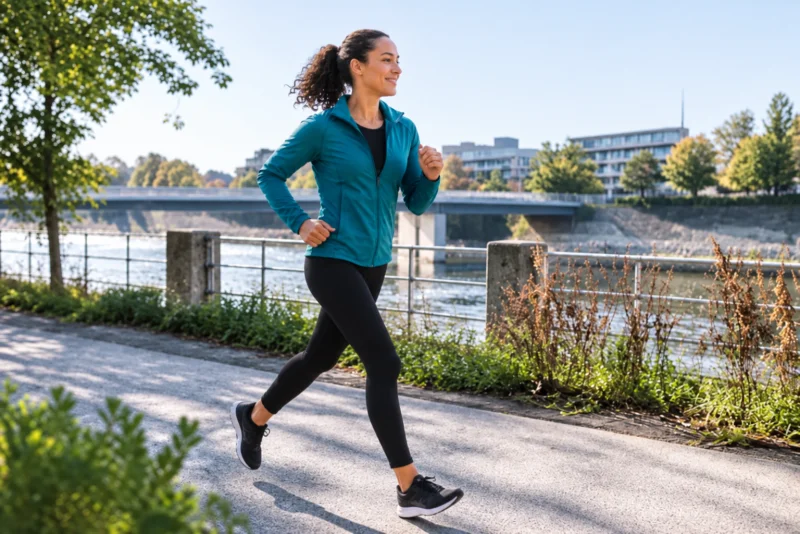
AI restoration illustration generated with Codex imagegen; not a Veyvia processing result.
When comparing this kind of image, check that the running pose has not shifted. Follow the outlines of the hands, jacket, and legs. Then examine whether background structures still align and whether clothing details look consistent with the source. A sharply defined face is not enough to accept an otherwise changed scene.
For a similar photo in Veyvia, start with Natural. If you try Strong, retain the earlier version for comparison. Some softness can be preferable to an awkward hand or invented clothing detail. Your intended use matters: a small personal post and an accurately documented sporting moment have different requirements.
What to Do When the Result Still Looks Wrong
The face looks like a different person. Return to the original. Try Natural, compare with extra face enhancement disabled, and make preservation instructions specific. Do not keep a version just because its eyes look more detailed.
The image looks crunchy or outlined. Compare against a gentler attempt and inspect high-contrast edges. Bright rims around hair and clothing can be more distracting than the softness you started with.
The result is larger but still unconvincing. Check the source quality. Enlarging a tiny image cannot verify features missing from that file. Look for a better copy, a neighboring frame, or another photograph of the same moment before spending credits on repeated attempts.
The background became too detailed. Request that the background remain soft. For changes limited to a small region, consider an editor with local controls. Adobe's Smart Sharpen documentation describes sharpening controls for adjusting sharpness in Photoshop.
The picture is damaged as well as blurred. Scratches, creases, and fading call for additional restoration work. Use the photo restoration tool when physical damage in a scanned print is the main problem.
Prepare the Image for Sharing
Keep the downloaded restoration as your working copy. If a profile, marketplace, or document needs particular dimensions, resize the image after you have accepted the visual result. Review that resized copy at its intended display size.
If the file is too large to upload, compress the finished image and inspect it again. Heavy compression can undo the clarity you were trying to improve. Avoid repeatedly downloading a social-media copy and using it as the starting point for another restoration.
Frequently Asked Questions
Can You Completely Unblur an Image?
Sometimes a soft photograph can be made more useful, but a complete and accurate reversal is not guaranteed. Severe blur may leave too little information to determine the original detail. Judge the result against your source and intended use rather than expecting every photograph to become perfectly sharp.
Is Unblurring the Same as Sharpening?
Sharpening generally makes existing edges appear more defined. AI restoration can also reconstruct plausible detail. That difference matters when you evaluate a face or an important object: more visible detail may have been generated rather than recovered from the photograph.
Can I Unblur a Photo on My Phone?
You can use Veyvia through your phone's browser, upload a saved photo, choose settings, and download the result. Check facial details in a full-size view before accepting the edit; a small screen preview can hide artifacts. Use the original file from your photo library when possible.
Is Veyvia's Photo Unblur Tool Free?
Generation uses credits and requires signing in. Review the current account requirements and pricing, plus the credit amount displayed in the tool before you generate. Do not assume that opening the page or selecting an image includes free processing.
Which Mode Should I Use for a Blurry Face?
Start with Natural so you have a gentler reference, then compare Faces if facial detail is the main concern. Keep the same source and aspect ratio when comparing. The mode name describes the requested emphasis, not a promise that identity will be perfectly preserved.
Can AI Recover Blurred Text or a License Plate?
Do not use a generated reconstruction to establish what unreadable text originally said. Plausible letters or numbers can be incorrect. Find a clearer original, another frame, or a separate reliable record when the exact information matters.
Should I Compress a Photo Before Unblurring It?
Use the best available original for restoration whenever possible. Save compression for a sharing copy after you have reviewed the result. If an upload limit forces you to reduce the source, keep the untouched file and make a separate copy rather than overwriting it.
Try It with One Photo
Choose a photo you know well, begin with Natural, and compare the result before experimenting further. Keep the original, preserve the details that matter, and accept a little softness when the alternative is an inaccurate reconstruction.